Showing posts with label The Little Blue House. Show all posts

Monday, March 22, 2021

My Easter Porch Decor


Happy Monday!

Over the weekend I finished up my porch decor for Easter. It seems so quick after St. Patrick's day, so I will probably leave this up for all of April.

I already know my next theme and it can stay up through June. Yay! Two months!! I have the best time making this decor and knowing next year it will be ready to go without any effort at all! I keep each season's theme in a separate bin so as I finish up each season, the next one will be ready. At least that's my plan for now.

Have a wonderful day and I'll see you again tomorrow.

Susie

Saturday, March 6, 2021

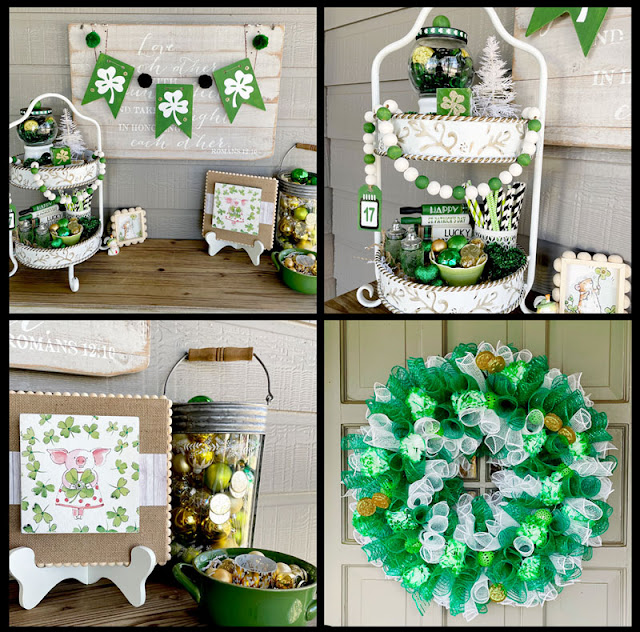
St. Patrick's Day Porch Decor

Happy Saturday!

I thought it would be fun to share my St. Patrick's Day porch decor with you today. 

I made all of my decor...but not everything is an original idea. I get inspiration from so many places, but then I try to always make the project my own. I hope you enjoy seeing this each time I change out my porch decorations.

Have a great day and I'll see you again tomorrow!

Susie

Thursday, February 18, 2021

Happy St. Patrick's Day


Happy Thursday!

I've been working on my St. Patrick's Day porch decor and while I've been doing that, I snuck in a napkinized card. Oh this holiday is going to be fun!

See you tomorrow!

Susie

Monday, January 18, 2021

You are Not Alone

Happy Monday!

Today's card is for a friend who needs just a bit of cheering up. The background is a napkin which I adhered to card stock and then die cut. I used this postage stamp die from my collection, but I do not know who makes it.

I used an embossed heart die set from Concord and 9th and also a sentiment strip from Taylored Expressions to finish my card.

I'll be back tomorrow and I'll see you then.

Susie

Friday, January 8, 2021

In a World Where You can be Anything...Be Kind


Happy Friday!

Today I took a break from my usual card making to finish up a few projects and I also started working on my tiered tray decor for my front porch. At Christmastime I used pink, aqua and mint for my table on my porch. I decided to continue with those colors plus some red for Valentine's Day.

My sign is actually made with a napkin and a wooden box. The flowers and gems are from my stash and that ribbon is a Dollar Tree find. I also worked on a second napkinized sign today which I will show you soon. It is much more bold and brings in the red.

I will have a new card project for you tomorrow, so I'll see you then.

Susie

Friday, December 25, 2020

Saturday, December 12, 2020

Merry Christmas and Happy New Year


Happy Saturday!

I finally decorated for Christmas this past week. This little guy sits in my kitchen along with a few other holiday items. I think I'll be sad when that decorated corner gets replaced with my Instant Pot again!

This is another napkinized project embellished with some tags I made years ago. But when I spotted them, I knew they needed to adorn this sweet Santa frame!

Have a great Saturday and I'll see you again tomorrow!

Susie

Monday, December 7, 2020

Sharing Some Christmas Decor


Happy Monday!

Just wanted to share a fun napkinized project with you today and how I displayed it.

My base is two Dollar Tree wooden box frames glued together. I like the chunky look. I added this sweet napkin and then embellished the sides with ribbon and the top with lots of bits from my stash. For the finishing touch I added a gold star to the top of the tree.

The tiered tray is from Hobby Lobby. I added lots of Dollar General items in coordinating colors to accent my project. This display sits on a table on my covered front porch along with some other decor and I love to look at it! Next year I am going to add a wreath to my front door in these colors. 

Have a great start to your week and I'll see you again tomorrow!

Susie


Saturday, December 5, 2020

Making Spirits Bright

Happy Saturday!

Here is another napkinized card. If you are interested in how to make cards from napkins, click here for a post I did earlier this week with a step by step tutorial.

Have a great day and I'll see you again tomorrow!

Susie
 

Wednesday, December 2, 2020

How to Make Cards Using Paper Napkins

Happy Wednesday!

I had some interest on a "napkinized" card I made last week, so I thought I'd give you a quick step by step on how to make your own. Mr. Reindeer above started out as a dinner napkin!

First of all, notice that napkins are usually two or three ply. You have to remove all except the top ply to make this work. So that's step one. Get your chosen napkin down to the top ply only.

Now this is how you will layer your workspace (from the bottom up):

Parchment Paper

Card stock (I use 110 pound, but 80 pound works too). I like to cut my card stock larger than I ultimately need so I can choose the best part of the "napkinized" image for my card.

Cling wrap (like Saran Wrap) a little bit larger than your card stock.

Your napkin of choice face up over the cling wrap

Parchment Paper 

So you now have your layers and you can fuse your card stock and your napkin. The cling wrap is your adhesive. You can use any size Cricut Easy Press. I have a large one and the mini. Both work. You can also use a hot, dry iron if you don't have an Easy Press.

So press that stack until your napkin is fused to your card stock. Pay attention to the edges and also make sure the cling wrap and your heat source do not make contact. That would make a mess.

You can give your card a very light application of matte Mod Podge if you plan to add anything water based to it. Remember - napkins absorb liquid. I've had good luck with Stickles without using Mod Podge. But any type of water based pen will ruin your project if it's not protected.

Have fun and enjoy the process. I'll be back tomorrow and I'll see you then.

Susie

Thursday, November 26, 2020

Tuesday, November 24, 2020

With Love at Christmastime

Happy Tuesday!

Believe it or not, this is a card made with a napkin. There is a special technique to this which I would be happy to share with you if you are interested.

I added Christmas Red Stickles to the berries and Diamond Stickles to the snowflakes for a bit of dimension. And the sentiment is a Simple Strip from Taylored Expressions.

Have a great day and I'll see you again tomorrow!

Susie


Sunday, November 22, 2020

Making Spirits Bright


Happy Sunday!

I've shown you a few napkinized projects before, but this one is one of my newest. It was originally a $1 find at Dollar General with a Christmas saying on it and just some greenery on the base.

I disassembled it and then painted the sign white. The base was already a pretty wood shade. I napkinized the sign and then reassembled the piece. I added new greenery and some small glass ornaments with hot glue. For my final touch I added the bells.

I absolutely love this little sign. I've made a few different ones to use as hostess gifts, but this one stays with me!

Have a great day and I'll see you again tomorrow!

Susie

Sunday, October 25, 2020

A Little Christmas Decor - Part 2


Happy Sunday!

As promised I have more napkinized Christmas decor for you today. Everything except the napkins and the sprinkles came from my local Dollar Tree.

Everyone who has seen this puppy has just laughed and laughed. Those eyes!! Those sprinkles!

Here is one more made with this same napkin, but a few other Dollar Tree supplies:

I'll be back tomorrow with a new card, but I wanted to share some other fun crafty goings on with you this weekend. Have a great day and I'll see you again tomorrow!

Susie

Saturday, October 24, 2020

A Little Christmas Decor - Part 1


Happy Saturday!

I have been having more fun playing with napkins. Yes, napkins! 

For this project I adhered two Dollar Tree "house" blocks back to back and painted everything with white chalk paint. Then I adhered the Christmas napkin to both the front and back. I sanded the edges and added a thin coat of Mod Podge. I then added some Xmas Red Stickles to the greenery on the left. I added glittery ribbon and some Christmas florals to the top and this one was ready to go. All supplies (except the adorable napkins) were from my local Dollar Tree.

I am excited to show you two more tomorrow! See you then.

Susie